HOWTO - Installing Windows Server 2003
By Erik Rodriguez
This article is a HOWTO on installing Windows Server 2003. This guide will help you install Microsoft Windows 2003 Server Web, Standard, or Enterprise Edition.
Introduction
Windows server is one of the most popular server operating systems for many different levels of business. It is one of the best because it easily integrates with the very popular Windows operating systems running on desktops and workstations. Windows Server was original developed as Windows NT. NT meaning "new technology," was engineered with a high performance file system know has NTFS. The way that NTFS works offers many advantages including advanced security. Many improvements have been made over the years with various components of Windows Server including Active Directory, Internet Information Server (IIS), and remote management. Currently, Windows Server is in the "release two" known as R2. R2 has a host of new features. One major feature is a better interface with UNIX/Linux services, as well as other tools to make management of the server and network services more efficient.
A Pre-Installation Note
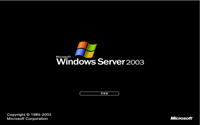
Let's face it: installing Windows isn't rocket science. Like every other OS out there, a wizard takes care of all the file copying and configuration. This guide simply gives you a look at what the installation interface looks like before you jump in and dedicate an entire hour and a machine. The screen shots of this installation were performed with the use of Microsoft Virtual Server 2005; Microsoft's version of VMware.
Getting Started
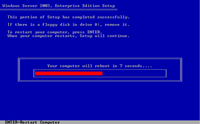
Step 1
|
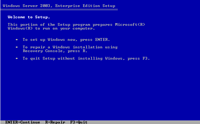
Make sure your machine is able to boot from a CD-ROM. Upon starting your machine, you will be prompted to hit any key to boot from the CD. You will then be prompted to hit "Enter" to continue.
|
 See a larger image
|
Step 2
Step 3
|
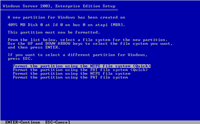
After pressing Enter again, your hardware will be probed. You will need to hit F5 to install a 3rd party SCSI or RAID driver at this time. Windows Server 2003 has excellent hardware support for both. I have used various SCSI, RAID, and SCSI RAID cards and never had to install a 3rd party driver. Once the hardware probe is complete, you will be asked to select a partition. If you have any existing partitions they will be shown. These steps are not shown in this guide due the way virtual server handles the disk drives.
|
 See a larger image
|
Step 4
|
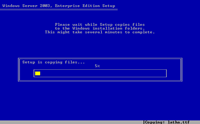
After selecting your file system, Windows will format the drive and copy the necessary files to begin configuration of the operating system.
|
 See a larger image
|
Step 5
Step 6
Step 7
|
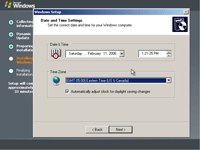
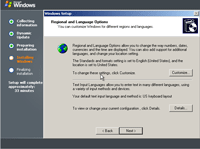
When the machine reboots, you will be prompted for language support. I chose english.
|
 See a larger image
|
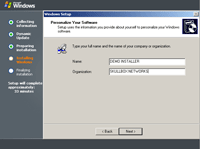
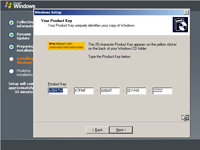
Step 8
Step 9
Step 10
|
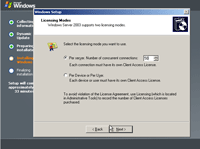
If you entered your CD key correctly, you will next be prompted for the type of licensing. The most common way is per server. If you chose per seat licensing, each client connecting to your server will use it's own Windows license. The draw back to this is that each client can only logon once. You cannot have multiple logins from the same user account at the same time in per seat licensing.
|
 See a larger image
|
Step 11
|
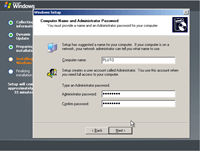
Next, you will be prompted for the computer name and administrator password. Choose a good password here. It won't let you something like "password." By default, Windows Server has a password complexity rule. If you need an idea for a good password, see this article.
|
 See a larger image
|
Step 12
Step 13
|
Next, you will see the copy progress as it installs the network and copies more files needed by the OS.
|
 See a larger image
|
Step 14
|
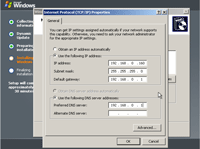
Next, you will be prompted for the network settings. You should always choose a static IP for server. I chose the custom settings. Fill in your appropriate IP address, subnet mask, default gateway, and DNS servers.
|
 See a larger image
|
Step 15
|
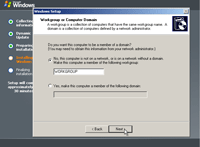
After your IP settings are finished, you can make your server a member of an existing domain. By default, it will be a member of the workgroup called WORKGROUP. You will still have the option to have that machine join a domain later. You can also use the active directory wizard to create a new domain after the setup of the OS is completed.
|
 See a larger image
|
Step 16
|
Next, more files will be copied and you will be prompted for the CD if it isn't already in the drive. After the files are done copying the server will reboot. You will then be prompted to login.
|
 See a larger image
|
THAT'S ALL!!!
|