
|

|

|

|

|

|

|

|

|

|

|

|

|

|

|
|
|

|

|

|

|

|

|

|

|

|

|
|
|

|

|

|
 |
|
|
|
|
Mailing List
|
|
By Joining the mailing list you will be notified of site updates.
|
|
Show Your Support For
This Site By Donating:
|
|
|
|
|


|
|
|
|
|
|

HOWTO - SQUID - Linux Webcache/Proxy Server
By Erik Rodriguez
This article is a HOWTO on the installation and configuration of SQUID. If you are looking for a dedicated webcache solution, see the article on Smoothwall. It's a dedicated linux firewall that includes squid.
What is SQUID?
SQUID is a webcache and proxy server for Linux and UNIX. It is widely supported by the open source community and is used on most medium to large networks. You may consider installing SQUID if your network:
- Has a large amount of Internet users (>=100)
- Consistently downloads files from remote servers
- Has a need to control Internet access
All of the above can be accomplished using SQUID. It is highly customizable and, therefore, can be used in many dynamic situations and topologies. You can view the main file for a complete guide of options. I will tell you that the conf file is very long. Editing with vi can take some time if you want to look through all the options. I have provided a usable squid.conf file to download here.
Configuring SQUID
Assuming you already have SQUID installed, let's move the squid.conf file to the proper place. In the example below, /export/temp/ is where I had my squid.conf file temporarily stored. I used the simple move "mv" command to move it to the /etc/squid/ folder. This example was performed on Red Hat Enterprise Linux 3, but this should work the same in other versions of Linux and FreeBSD.
[root@roswell temp]# mv squid.conf /etc/squid/
mv: overwrite `/etc/squid/squid.conf'? y
[root@roswell temp]#
Remember, you must be logged in as root to perform some of these operations. The squid.conf file available from this site is setup for very general use. The cache_mgrt has not been defined and should be your e-mail address. As far as the networking goes, this file is using the 192.168.x.x non-routable network. You may need to edit this to reflect your IP scheme. To begin, you must initialize the squid
[root@roswell squid]# squid -z
2005/01/01 02:11:45| parseConfigFile: line 1942 unrecognized: 'cache_mgrt root
2005/01/01 02:11:45| Creating Swap Directories
[root@roswell squid]#
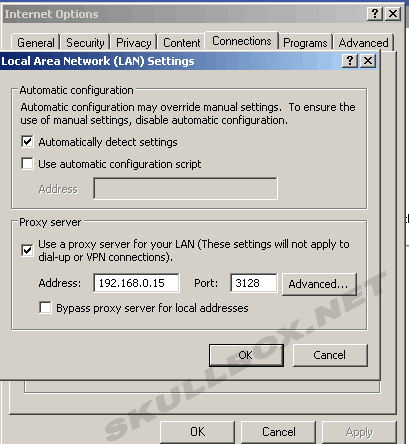
You should also remember to start SQUID and make sure that it is active upon reboot. Your clients will need to change the settings in their browsers to connect to the server.
[root@roswell squid]# /etc/init.d/squid start
Starting squid: .                                          [  OK  ]
[root@roswell squid]#
Transparent Proxying
You may want SQUID to run transparently. This means your clients will not have to change the settings in their browsers, and they will not even know they are using SQUID. Your server running squid (with 2 network interfaces) must use IPTABLES. I am not going to force these commands because I am not using a transparent proxy. The iptables command you will need is:
- iptables -t nat -A PREROUTING -i eth0 -p tcp --dport 80 -j REDIRECT --to-port 3128
You will also need to enter this command into your bootup script under /etc/rc.d/ so that it runs every time the machine is rebooted. Now, you may have a dedicated routing box and a dedicated server running squid...something like this:
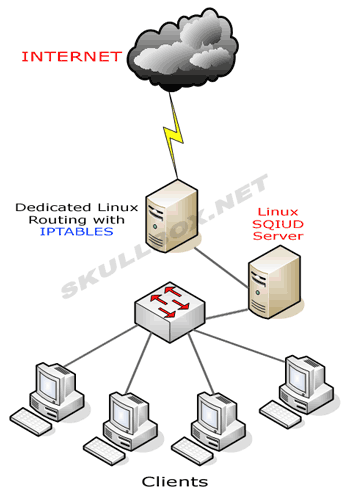
You will need to redirect traffic from the dedicated box by using these commands for IPTABLES (exclude the "" marks because they are only there to show you what you need to change):
- iptables -t nat -A PREROUTING -i eth0 -s ! "your squid server here" -p tcp --dport 80 -j DNAT --to "your squid server here":3128
- iptables -t nat -A POSTROUTING -o eth0 -s "your network IP scope here" -d "your squid server here" -j SNAT --to "your routing box here"
- iptables -A FORWARD -s "your network IP scope here" -d "your squid server here" -i eth0 -o eth0 -p tcp --dport 3128 -j ACCEPT
If your routing box is using dynamic IP, add the following line as well:
- iptables -t nat -A POSTROUTING -o eth0 -s "your network IP scope here" -d "your squid server here" -j MASQUERADE
Contact Us
NOTE: this form DOES NOT e-mail this article, it sends feedback to the author.
|
|
|
|
|
|