
|

|

|

|

|

|

|

|

|

|

|

|

|

|

|
|
|

|

|

|

|

|

|

|

|

|

|
|
|

|

|

|
 |
|
|
|
|
Mailing List
|
|
By Joining the mailing list you will be notified of site updates.
|
|
Show Your Support For
This Site By Donating:
|
|
|
|
|


|
|
|
|
Audience: Gamers
Last Updated: 6/12/04 4:16 AM
Original Creation Date: 1/28/04 1:22 AM
**All times are EST**
|
|

XBOX MOD Chip Installation
By Erik Rodriguez
Plain and simple, this article shows you how to install a mod chip. This info can be found other places, but I had to look several places to find all of it.
Things you will need:
- A Mod Chip
- 2 sizes of star tip screw driver heads
- Phillips head screw driver
- Patience
- About 1 hour
- Magnification Lense (Optional)
- Soldering Iron (Optinal)
Let me start by saying there are 5 important tips to start moding:
| BE PATIENT! |
DO NOT try to rush the job. I promise, you will be happy with the outcome if you take your time. |
| Cleaning |
Clean metals and circuit boards with alcohol and a Q-tip. |
| Lighting |
How are you going to work on circuit boards and computer parts in the dark? |
| Be safe |
The power supply of the XBOX is completely exposed. There is a great risk of shock. Keep your hands clear of all the components. You do not want
to learn the hard way. (Like I did) |
| Be smart |
DO NOT put the soldering iron down on the carpet. IT WILL BURN! |
Getting Started
Start by removing the larger size star tip screws from the bottom of the XBOX. There are 6 of them. Four under the rubber feet and two under the labels near the
middle of the box.
The front panel will stay intact and the top will lift upward to reveal the guts. Be careful not to lose the screws; I think you would have a hard time finding
replacements. You should see the drives as shown below:
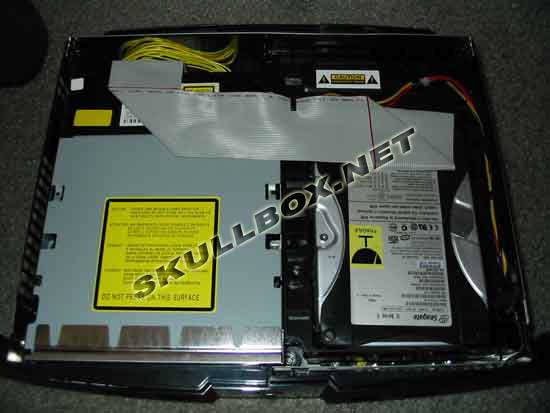
Next, carefully lift the DVD drive out. You do not need to unscrew anything, there are little "clip thingies" (circled in red)
holding the drive into the plastic housing.
Chip Time!
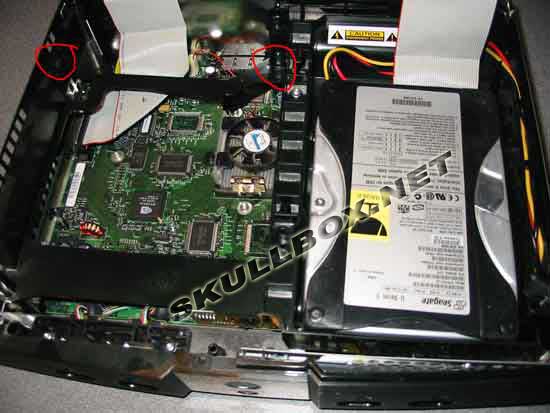
It is not necessary to remove the hard drive. It comes out the same way the DVD drive does. Although, I had to unplug the power connector because it wasn't long
enough and prevented me from removing the drive from its plastic housing. I removed both drives because I wasn't sure what side the mod chip would go on.
Since you already have the cover off, it would be a great time to clean. Never clean with water. Only use alcohol or petroleum based cleaners (available at
radioshack) to clean circuit boards. Do not mess with the power supply. Circled in red is the location for the mounting bracket:
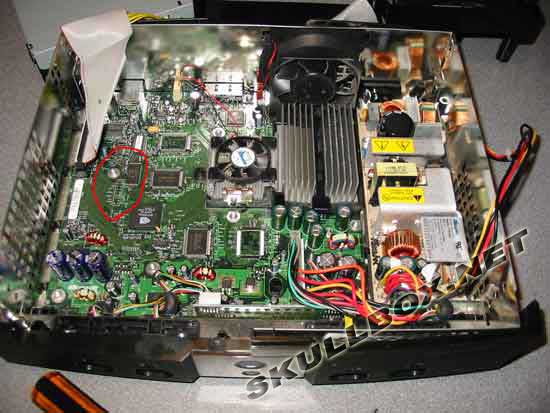
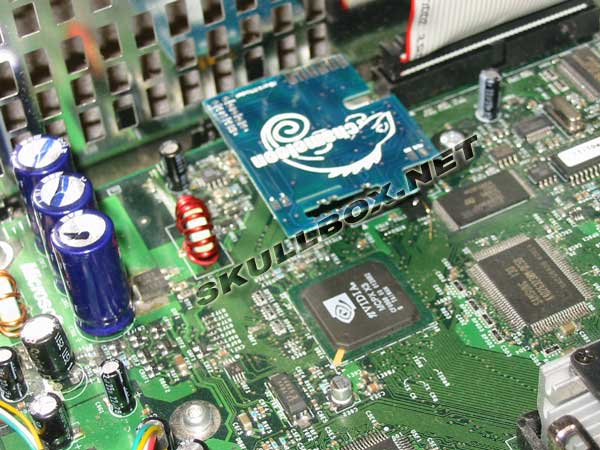
Remove the grounding screw from the motherboard (smaller star tip screw head) to allow for the chip bracket. You may want to use a magification lense because it
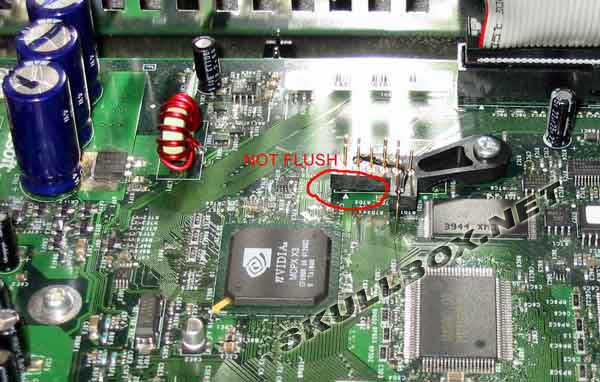
is hard to see if the pins are making contact with the solder points. NOTE: The bracket will not fit flush against the board. It took
me a few times to realize this, but the pins on the bottom of the bracket are spring loaded. Make sure the center of each pin is touching the solder points on
the board.
The next part is tricky! There is a tiny piece of bus wire that must be placed in a ground hole on the motherboard. Be careful not to break the connection to
the plastic bracket. The wire should be sturdy. It should not move like a swinging gate. If it does, the solder joint is broken, and must be re-soldered. This is
where I recommend the soldering iron. Not only for repair in the event that the solder joint is broken, but if you are daring enough to solder the wire directly to
the motherboard. I had a problem with the wire staying in because when I turned the XBOX upside down to put the screws back in, the grounding wire kept coming out of
place. It is very hard to solder directly to the XBOX motherboard.
I do not recommend it unless you are experienced at soldering. If you are going to solder to the board, use a 25 watt iron.
Below, the bus wire is shown in the grounding hole:

You're Done! For the final step, put the chip on the mounting bracket. Make sure that the chip is plugged in the correct way. The particular model I used faces toward
the side of the box. Your model may be different. Remember that if the bus wire comes un-grounded, the mod chip will not work, and you will notice no change in the
original operation of your XBOX.
Finally, you must flash your BIOS. You will not get any extended features from the chip without a BIOS flash. Make sure you have the right BIOS for your chip!
|
|
|
|
|